Three Top Methods for Leading a Target
Mix up your methods for leading targets, and watch more birds fall.

We may earn revenue from the products available on this page and participate in affiliate programs. Learn more ›
We are now solidly into the very disappointing 21st century, and our smoothbores have still not been replaced by the ray guns I distinctly recall being promised to me by science fiction of the 1960s. That means wingshooters still must contend with the problem of lead. Because we shoot projectiles that travel at the speed of lead, not light, we have to shoot in front of crossing birds to hit them. And the question has long vexed hunters: How, exactly, to lead targets, and by how much? There is some progress, though. More and more of today’s shooters are experimenting with different methods of lead—and dropping more birds in the bargain.
Three Ways to Lead
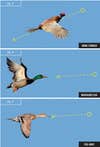
Most self-taught shooters use the swing-through method for all of their shooting (see fig. A). It’s easy and instinctive: You start the gun behind the bird and swing through it, “painting it from the sky,” as my dad taught me. Or “butt, belly, beak, bang,” as the English say, which reflects the fact that you pull the trigger as you pass the beak. Swing-through is great on flushing birds, for other shots inside 30 yards, and for trap. But as distances increase, it becomes increasingly harder to swing through and connect on crossing targets.
Two other methods work much better on longer shots. The first, maintained lead (fig. B), is preferred by skeet shooters, who know where the target is coming from and how much lead it requires. Here, you insert the muzzle ahead of the bird, move the gun to match the speed of the target, and then shoot when the gap between bird and gun looks right. The second, pull-away (fig. C), is a favorite of sporting clays shooters. You mount on the leading edge of the clay (or the bird’s beak), and pull away from the target, again shooting when the gap looks right.
The biggest difference between swing-through and the latter two is that with maintained lead and pull-away the bird is never ahead of the gun barrel, and so you in turn never feel you have to rush to catch up—which is exactly what undoes swing-through shooters on long birds.
Switching from one method to another, depending on the shot that’s presented, isn’t as hard as it sounds. Growing up a bird hunter, I was always a swing-through-only shooter until a sporting clays instructor introduced me to maintained lead on a long crosser. I hit more targets immediately, and still use it for any crossing bird. Being familiar with all three and correctly pairing the method to the shot will make you a better all-around gunner.
Back to Basics
The best place to try a new technique is on the practice range, which also happens to be the right venue to perfect the basic elements of lead. Which you should do, because although adopting different methods can surely help, it surely won’t if you get any of these four fundamentals wrong:
1. Don’t Measure
Everyone sees lead a little differently. What looks like 2 feet to me may look like 4 to you. That said, as a general rule, most gamebirds in good shotgun range can be killed by shooting just in front of their heads. If they’re farther away, double that gap. If they’re really far, double it again.
It’s more of a feel, however, than an exact distance. The more you shoot, the more your brain stores targeting solutions, and the more you can trust your subconscious to tell you when to pull the trigger. Measuring lead results in misses because it requires you to look at the gun, which slows it or stops it from moving, and you miss behind. Most birds are missed behind by feet, not inches, because the shooter checked the lead and stopped the gun.
2. Stay Focused
Keep your eyes on the target. The bird should be in tight focus while the barrel blurs in your peripheral vision. Narrow your focus as tightly as you can. Look at the eye, the beak, the green head, the neck ring, or the white cheek patch of the bird you’re shooting at. The more precise the visual information you feed your brain, the better job it will do of sending your hands and gun where they need to go.
3. Get in Line
Following the target’s line of flight is crucial. If you are not on line, you’ll miss, even if your lead is right. If you are on line, you’ll probably hit it, even if the lead is “wrong,” because you’re shooting a wide pattern, not a single bullet. As you swing, hold the muzzle slightly below the bird so you can keep the target in sight.
4. Move in Time
You must swing the gun more or less in time with the target, all the way through to the end of the shot. If you shoot maintained lead, you want to match the target’s speed. For swing-through and pull-away, think of swinging 1 mph faster than the bird. Don’t rush it. Going too fast destroys your feel for the target and draws your eye to the bead. Move in time with the bird and everything seems to slow down, like bullet time in The Matrix, and shooting becomes easy. So it’s like science fiction after all, just without the ray gun.
GEAR TIP: A Second Shot of Bismuth

Hunters who want to bring older guns back into the duck blind now have a second option, as Kent Cartridge joins Rio in offering bismuth shotshells. Kent says that its proprietary bismuth pellets will be very near the density of lead, and much less prone to shatter on bone than older bismuth. The new shells will be available in 12, 16, and 20 gauges in 4, 5, and 6 shot. Kent is famous for its Tungsten-Matrix shot, but the price of tungsten has skyrocketed, leaving bismuth as a “reasonably priced” alternative. The new loads should sell for around $2 per shell.