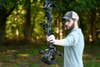
Expert Tips on How to Draw a Compound Bow
If you want to shoot your bow well, first you need to learn how to draw a compound bow correctly. Here's how

We may earn revenue from the products available on this page and participate in affiliate programs. Learn more ›
Experienced bowhunters know that the way you draw your bow ultimately determines the accuracy of your shot. But what makes for a good draw? Here are a few things to consider when learning how to draw a compound bow. These are helpful tips for beginner archers—but they’ll also be good to remember throughout your bowhunting career.
After all, practice doesn’t make perfect; perfect practice does.
How to Draw a Compound Bow in Four Steps
Step 1: Determine Your Draw Length
The first step toward learning how to draw a compound bow is determining your draw length. Pro shop staffers often use an arrow with inches marked along its shaft to do this. Put the nock of the arrow at the base of your throat, stretch both arms out in front of you, and touch the arrow as far out on the shaft as you can. The corresponding number of inches is your draw length.
Next, determine if your chosen bow is capable of handling your draw length. Shooters with shorter-than-average draw lengths often require special cams, as do shooters with longer-than-average draw lengths. Then, you’ll want to ensure that the length of your D-loop, if you use one, and your release aid combine to bring the string back the appropriate total length.
Filming yourself shooting is an excellent way to tell if you have gotten everything set correctly. If you have, your bow-drawing elbow will point straight back from the bow when you are at full draw, not kick out away from you or come too far back behind you.
Likewise, your bow-holding arm will have a slight bend in it at the elbow. If you need to lock your elbow to get to full draw or have a significant bend in your elbow at full draw, your draw length is too long and too short, respectively.
Step 2: Pick the Correct Draw Weight
Most bows come from the factory with limbs that provide 70 pounds of draw weight when tightened in the limb pockets. Bow manufacturers design their rigs to shoot best with the limbs tightened all the way down, but that may be too much for you to handle right out of the gate. This will make it difficult when learning how to draw a compound bow. Resist the temptation to shoot your bow’s max weight too soon. Loosen the limbs a safe amount, build the proper shooting form, then move up to a higher draw weight. Consider buying additional, lower-weight limbs if necessary.
You’ll know you’re shooting too much draw weight by the way you draw your bow. If you struggle to get your bow to full draw, shaking your bow and jerking the string back, you definitely need to lower your draw weight until your muscles are ready to handle the strain.
Another way you’ll know is a bit more subtle. Do you have to raise your bow 45 degrees or so and then pull the string down and back to come to full draw? Do you have to aim your bow down and pull back on the string sort of like you’re starting a push mower? Both are signs that you’re pulling too much draw weight.
The ideal draw is a smooth, straight-back motion that comes to the end of the draw cycle without excessive effort. There are several benefits to such a draw: lower odds of spooking game by your movements, less chance you’ll send an arrow flying off into the air if something catastrophic happens to your bow/string/release aid while coming to full draw, acquiring your target quicker than otherwise, and more.
Videoing yourself shooting can be beneficial here as well.
Step 3: Quit Gripping Your Grip
The importance of your knowing how to hold a bow cannot be overstated. The palm of your non-dominant hand (unless you’re cross-eye dominant) is the only part of your body that really touches the bow, as your dominant hand only touches the release aid. Therefore, it’s important that you get this interface right every time you draw your bow.
The part of the riser where your hand will touch the bow is called the grip, but that doesn’t mean you should actually “grip” it. The correct way to hold your bow is to put the back of the grip along the bone in your palm that leads up to your thumb. This gives a solid connection between you and the bow, provides you with a repeatable reference point, and produces less torque on the bow when you are drawing it.
Don’t curl your fingers around the front of the grip, either. This will also impart torque at full draw, and you’ll be tempted to squeeze or jerk your bow when the arrow is released. The ideal follow-through in archery is for your bow to fall forward and away at the shot. Your stabilizer weight, bow accessories, and hold on your bow should all facilitate this. Use a lanyard around your bow-holding hand’s wrist if you are afraid of accidentally dropping your bow after the shot, but do not death-grip the grip.
Again, be sure to also keep a slight bend in your bow-holding arm’s elbow. Doing so keeps your forearm away from the string during the shot.
Step 4: Find Your Anchor
The final aspect of learning how to draw a compound bow correctly is finding your anchor point when you reach full draw. Bowhunters use a number of different techniques for doing this—from a plastic “kisser” button that touches the corner of their mouth to a knot of serving string that does the same to touching the string to their nose the same way every time and more. However you decide to gauge your anchor point’s repeatability, just make sure that you stick with it from shot to shot. Consistency is key in bowhunting.
How to Draw a Compound Bow: Putting It All Together
I won’t tell you that doing all of the above will guarantee you arrow a Pope and Young animal this year, but it will definitely give you the ability to consistently and accurately hit your target. Pursuing the perfect draw is part of hunting your favorite game species. Get out there this season and do both.