To clean a trout, slit the belly from vent to gills, open the chin membrane, then use a pinch grip to rip out the gills and guts in one motion. Finish by scrubbing out the bloodline along the spine with your thumbnail. Small trout clean in seconds and cook whole. Large trout require filleting and an extra step to remove pin bones.
- Size determines your cleaning method. Small trout clean whole; large trout require filleting.
- Opening the chin membrane first makes removing gills and guts a single clean pull.
- A pinch grip—thumb outside, finger inside the throat—controls the gut-removal motion.
- Scrub the bloodline along the spine with your thumbnail; leaving it on affects flavor.
Maybe you live squarely in stocked trout territory and are looking to load up a stringer. Or you’re going camping in the Rocky Mountain backcountry are just hoping for one or two trout for dinner. Either way, if you’re planning to eat some trout, then you’ll need to know how to clean a trout. Lucky for you, trout are particularly easy to clean compared to many other species of fish. All that determines the method of attack is the size of the trout you landed.
Larger trout can be filleted in a similar manner to any other big fish, except you’ll have to take an extra step at the end to remove their pesky bones. Small trout, on the other hand, can be cleaned in seconds and cooked whole. So, whether you’re catching cookie-cutter 12-inch stockers or you lucked into a rainbow big enough to feed everyone at camp, here’s how to clean a trout and have ready for the fire, grill, or frying pan in a matter of minutes.
How to Clean a Trout in 4 Easy Steps
Step 1: Slit the Trout’s Belly
Hold the trout in your non-dominant hand with the head pointed away from you. Insert the tip of your knife with the blade oriented away from your body into the fish’s anal vent—a.k.a. the trout’s butt. Slide the knife toward the head to open the body cavity. Run the knife all the way through the notch between the fish’s gills and stop.
Step 2: Open the Trout’s Chin
Below the trout’s jaw, you’ll find a thin membrane of skin between the bone and the lower part of the fish’s throat. Insert the tip of your knife at a perpendicular angle to the head through this membrane and push the knife forward to sever it. This will create a hole in the chin (see the video above).
Step 3: Remove the Trout’s Innards and Gills
With a firm grip on the fish in one hand, stick the pointer finger of your other hand into the hole you created in the chin and work it down into the trout’s throat. You’ll feel your finger rub against the interior gill rakers during the process. Now, stick the thumb of the same hand under the gills from the outside. You’re essentially pinching your thumb and forefinger together, and once you have a firm grip, rip downward firmly moving toward the fish’s tail. In one clean motion, this will separate the gills, throat, pectoral fins, and guts from the trout, leaving the fish with an empty body cavity.
Step 4: Clean the Bloodline
Although the fish’s guts are now gone, there’s one more job to do. You’ll notice a black line running along the fish’s spine covered by a thin membrane. This is referred to as a bloodline, and the material within it can give the trout a bad flavor. Though you can remove it with your knife, the easiest way is to keep running through it with your thumb nail, rinsing between passes until the dark matter is gone.
Your trout is now cleaned and ready to be cooked whole, and one of the most common ways this is done—whether on a grill or over an open campfire—is by stuffing the body cavity with lemon, herbs of your choice, garlic, butter, and seasonings of your choice before wrapping the fish in aluminum foil and tossing it in the heat. You can, of course, pan fry whole trout, though be mindful that small trout can fall apart easily when cooking, and the skin loves to stick to the pan. Once cooked, however, the meat can be easily separated from the bones with a fork.
Bonus: How to Clean a Trout by Filleting It, in 4 Easy Step
arska n / Adobe Stock
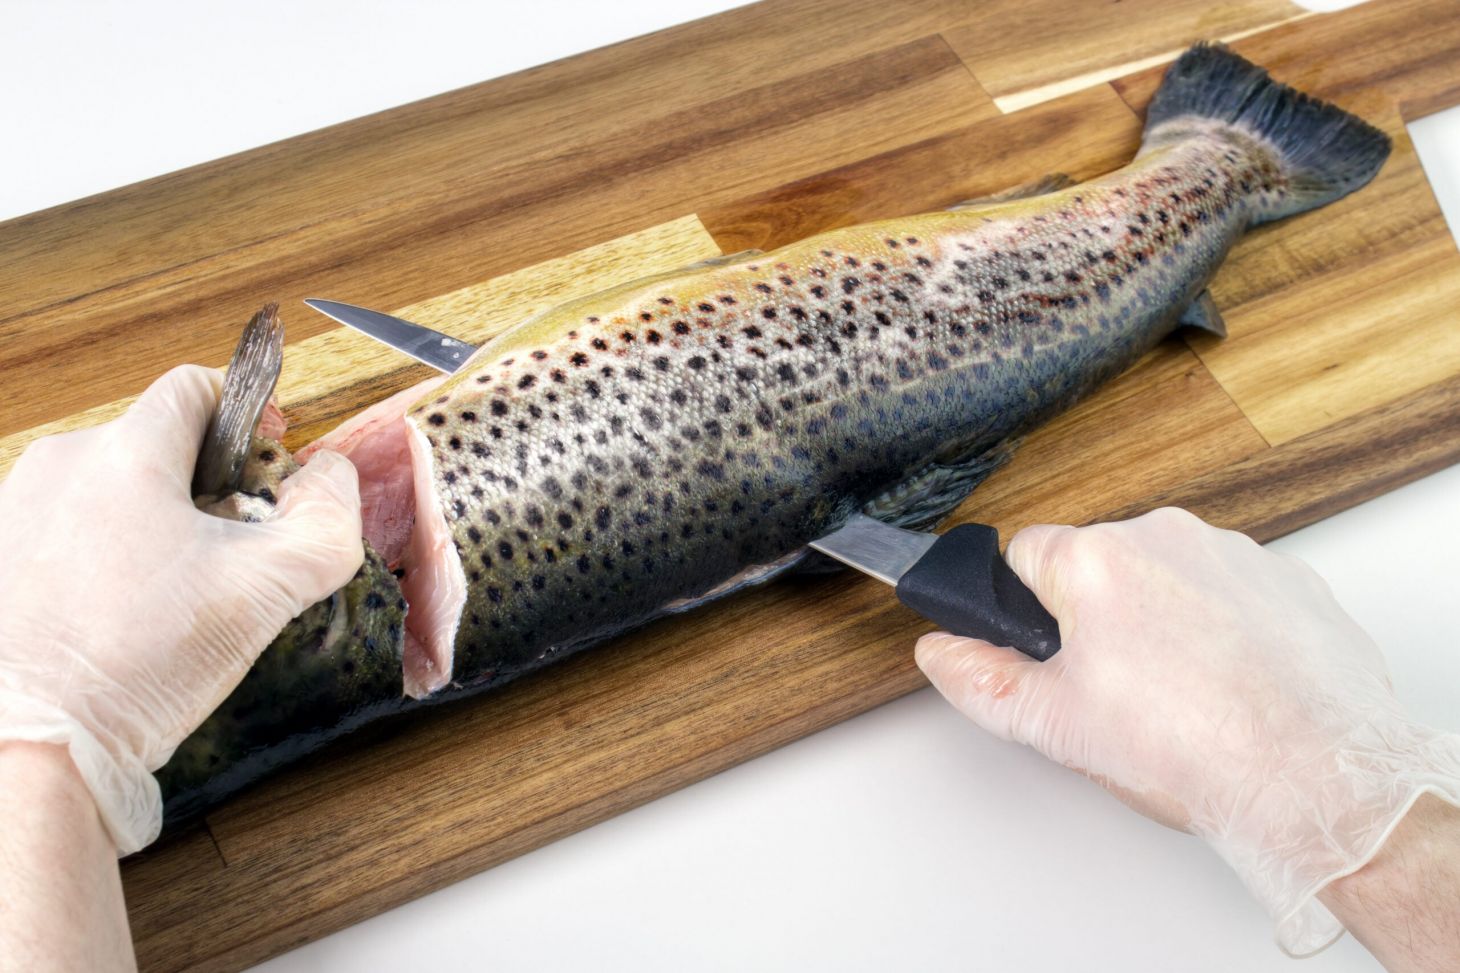
Step 1: Make the First Incision
With the trout on a cutting board or flat surface, use a fillet knife to make diagonal cut behind the gill plate, more or less perpendicular to the length of the fish, from the head to the belly (see above). This cut should be deep enough that you feel the blade hit the spine.
Step 2: Trace Along the Back of the Trout
Turn the fish so its back is facing you. Now, at this point, you can simply turn the knife on its side and run it along the backbone rom the previous cut to the tail to remove the fillet. But I think the process tends to work better if you take a second to trace along the back with a shallow cut first. So, starting at the previous cut, insert the knife tip into the fish’s back and begin making a shallow slice towards the tail. Take your time, making sure you’re following right along the backbone. When you’re an inch or two from the base of the tail, push the blade all the way through until it exits near the belly on the same side of the fish. With one final slice, move the knife toward the tail. This will create a flap at the base of the tail.
Step 3: Separate the Fillet
Next, begin slowly working the knife blade down the cut along the trout’s back. Go slow and make sure your knife is almost parallel to the table. Don’t cut too deeply. Just keep the knife working in steady strokes along the entire body until you reach the belly and can finally separate the fillet from the fish. Repeat steps 1 through 3 on the opposite side of the fish.
Step 4: Remove the Bones
Now that you have two trout fillets, you’ll want to remove the bones. You can buy pecial fish bone tweezers for this, though I use a pair of hemostats from my tackle pack and they work just fine, as does a small needle-nose plier. Slide your finger gently along the fillet feeling for the ends of rib bones and pin bones. When you locate one, grab it and pull slowly. Though this may seem daunting, there aren’t that many bones in a trout fillet and it’s usually quick work.
What you’re left with are two boneless skin-on fillets and, in my opinion, this method for how to clean a trout makes the fish more enjoyable on the table than cooking them whole. The reason for this is because I think trout can be a little bland, and it’s difficult for herbs and spices in the gut of a whole trout to deeply penetrate and flavor the meat while cooking. A fillet, on the other hand, can be heavily seasoned and seared meat-side down in butter or a sauce, giving it more flavor.

THE 1871 CLUB