Photography and fishing have been intrinsically linked throughout history. Anglers traveling to beautiful, far-away, and nearby places have documented their surroundings and trophy catches for years. And everyone knows that bragging rights must be accompanied by photographic proof.
Digital cameras have gotten faster, cheaper, and a whole lot more powerful. Almost everyone owns a camera and, therefore, everyone can be a photographer.
While most snapshots do a fine job of documenting a trip, why not up the ante and take better photographs? Creatively composed shots are not as complicated as one might think. By following and practicing the next twenty suggestions and tips, you’ll be outshooting your buddies in no time. Just be careful you don’t get too good or you might be doing more shooting than fishing.
Read about the camera Tim Romano
1. Learn what the buttons do: Sit down with your camera manual and read. You don’t have to learn everything, but knowing the basics is important. Modern point-and-shoot cameras are powerful machines that combine a ton of features that are easy to use and can vastly improve your photos. Most people never take their camera off “auto,” which is a shame.
Testing your camera Tim Romano
2. Check to make sure your camera’s working before you head out: Are the batteries fresh? Is everything working properly? Are your memory cards erased? Check to make sure the camera is not still switched to the “indoor light” settings from your little sister’s birthday party the night before. There have been numerous occasions where my first great shot of a trip is ruined because my settings were wrong for the occasion.
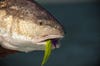
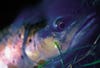
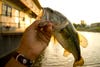
3. Have your camera accessible: I can’t tell you how many times I would have had a great shot if my camera was not buried under pounds of fishing gear, lunch or my rain jacket. Have the camera at the top of your pack, a pocket of your vest or slung around your neck. If you’re worried about it getting wet, buy a small dry bag that can easily be slipped into a vest pocket. Dry bags have gotten slimmer, and less expensive. Easily worth the money for protecting your camera. Tim Romano4. Be aware of condensation: Much like bringing a cold beverage out of the freezer, your camera will “sweat” and fog up if brought from the cool air of A/C out into a humid or hot environment. Some cameras will malfunction and actually shut off if the condensation becomes too much for the internal circuitry. The same goes for shooting in the winter – if it’s hot inside and you march right out into the cold the same thing will happen. Let your camera get accustomed to its environment for a full hour before its first use. This image was ruined because I forgot I had left my camera in the cooler for an hour after placing it there quickly and forgetting about it. Tim Romano5. Use your macro setting: Most point-and-shoots have amazing macro capabilities that are never utilized. On most cameras, the icon for this setting is a little flower. This will allow you to fill the frame of your picture with a fish’s eye, unique markings, the fly you tied, or the lure sticking out of the fish’s mouth. Tim Romano6. Centered images are typically boring: While this is not always the case try and use the rule of thirds. Divide your frame into thirds both horizontally and vertically. Place the center of attention on one of those “third lines.” Tim Romano7. Make the fish “pop”: Use your longest zoom setting (without using digital zoom). Without going into the technical details, this “stacks” the image compressing space. Typically this will throw your background into a soft focus, drawing the viewer’s eyes to the subject. Tim Romano8. Always, always, always look for distractions in the photo: This is harder to do than one might think. It’s a practiced skill, but will vastly improve your images. For example, don’t let cousin Joe’s backpack into the side of the frame or your buddy’s fishing rod hover into your shot from out of nowhere. Isolating your subject matter without all the distractions will improve the overall composition of the shot. This shot could have been a bit stronger without that reed cutting right through guide Johnny Quiroz’s neck. Tim Romano9. Be steady: Take a breath and hold it while you shoot. The reason most wildlife shots don’t turn out is that the camera moved during the photo, producing a bit of blurring or fuzziness. Many people blame this on the camera or lens, but it is almost always the photographer who is to blame. Be especially aware of this during low light situations. These two shots were seconds apart. The top one was taken first. After I noticed how blurry it was I simply braced my hands, pulled my arms into my body, took a deep breath, held it for a second, and retook the shot. Tim Romano10. Be stealthy and slow down: This not only helps your fishing, but your photography, too. Putting your rod down and walking very, very slowly will allow you see some amazing things while out on the river, lake or ocean. Holding fish don’t dart away, eating fish continue to eat, birds don’t flush and spook fish. Some of the hardest shots to get are fish underwater photographed from above or a fish eating a specific fly. Tim Romano11. Take more than one shot: Take three times as many photos as you normally would. Many cameras have a setting to take more than one shot at a time. This is especially important when shooting fish as they like to flop around when out of the water – making the hero shot challenging at times. The more shots you can rip off in a couple of seconds the better. Take more than you need and if you’re short on card space just erase the ones you don’t like after you’ve released the fish. Tim Romano12. Learn how to hold a fish for a better grip-and-grin: Remember that heroic fight, the run down the bank, the last ditch effort by your fishing partner to net the fish of a lifetime? After all that, don’t waste the shot by holding the fish awkwardly. Here’s a foolproof method for getting the best shot of your fish. Drop your arms to your sides, face your palms out. Now think about the fish resting on just the very tips of your fingers and letting your thumbs slide behind the fish, partially obscuring them from view. Be very cognizant of damaging or covering up the gill cover and pectoral, pelvic, and anal fins. Position your hands behind the head and in front of the tail. If the fish is larger and you need a little bit of elbow grease to hold it, simply switch the position of your tail hand to the front of the fish grasping with your entire hand around the front of the tail. This covers a bit more of the fish but still shows the tail and makes it a bit more manageable to control large fish. Tim Romano13. Try something different: Instead of the same old awkward holding big fish picture try something different. Take a picture of the smallest fish you caught that day. Hold the fish as far away from your body as possible with the fish safely over and low to the water. Focus just on the fish. This tends to make them look quite a bit larger. Try taking a photo of the fish resting in the net, in just a couple inches of water. Take your first shot just as the fish is slowly being raised out of the water. Sometimes this freezes the water dripping off the fish making for a nice effect. Rest your fish in some slack water and take a couple of shots as he makes his dash for the current kicking up a wave in the process. The options are endless so get creative… Tim Romano14. Be nice to the fish: Speaking of fish out of water, my friend Marshall Cutchin of midcurrent.com might have the best yardstick for how long a fish should be out of water. Out fishing one day his friend was trying to take pictures of a fish he caught. When he asked how long he could hold the fish out of the water Marshall replied that he should start holding his breath as soon as the fish came out of the water. When you run out of breath it’s time to let the fish go. Basically, don’t abuse the fish just for a photograph. Make it short and sweet. Tim Romano15. Get closer to your subject: Look at most of your photos of fish or fishing friends or the boat. I’ll bet most of them are taken from about 10 feet back. Don’t be scared, that fish isn’t going to bite… to hard. Get on up in its grill and take some interesting shots. Fill the frame with angler and fish. Here’s a good rule of thumb. Whenever you take your next image of friend, fish, camp, whatever, get twice as close as you normally would and take a couple of shots. In fact take a bunch. You can always erase them. Tim Romano16. Think “focus”: Most cameras autofocus using a best guess technique. This can be difficult if the subject is partially obscured by vegetation or you want to frame off-center. One trick is to put the subject dead center, press the shutter halfway down to set exposure and focus, then while still holding down the shutter (to maintain that exposure and focus) reframe the photo and shoot. If it is a really tough autofocus shot (obscured by vegetation) switch to manual focus if you can. Tim Romano17. Stop and look around: Anglers get to see some amazing sights when out in nature. Colorful sunsets, sunrises, gatherings of migratory birds, strange animal behavior, incredible landscapes, friends doing silly things…shoot this stuff. In fact, shoot this more than just your standard trophy or grip-and-grin. It can be far more interesting when looking back at your tip as a whole. Tell a story, not just a piece of one. Tim Romano18. Try different angles: Ninety percent of pictures I see are taken at eye level. Stop being lazy. Get on your knees or your stomach. If you can, get above the situation, like on the roof of you car or the bed of your truck, and shoot down. Take a picture of that fish at the level of the water – with just its eye above the water line. Tim Romano19. Track the sun: “Keep the sun at your back” is still true with digital photography. Colors are typically much better if the fish is in sunlight rather than in shadow. Shooting into the sun will render anything other than the background as silhouette. This can work in your favor if the landscape is your main focus. A well placed silhouette can really make a photograph. Tim Romano20. Mind the light: Keep in mind the “magic hour,” which is just after sunrise and just before sunset when the sun is low on the horizon. The sunlight is traveling through more atmosphere and this provides a warmer, richer light. Tim Romano
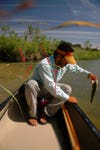
This summer, don’t settle for lame grip-and-grin photos when you go fishing. Here are 20 tips from pro photographer Tim Romano that will get you some show-stopper shots on the water. It’s not as hard as you think.