Print Subscription-$35 for the Best Field & Stream Stories · Subscribe Today
F&S | Featured Story
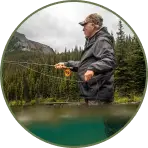
HOofing It to Trout HEaven
Yeah, way down yonder on the Chattahoochee. Never knew how much that muddy water meant to me.
By Kade gewanterApr 20, 2024
Yeah, way down yonder on the Chattahoochee. Never knew how much that muddy water meant to me.