In honor of Earth Month—and Earth Day later this week—we’re celebrating the best way we know how: with a series of stories that are all about getting outside and getting your hands dirty to benefit wild places and wildlife. Every day this week, we’ll share articles about habitat projects, gear-repair tips, and conservation calls-to-action. Welcome to Dirt Week.
At the end of the 19th century, wood ducks were thought to be the most abundant waterfowl species on the continent. By the end of the 20th, they were on the brink of extinction in America through a combination of market gunning, logging, and land development. So, what do you have to thank for the fact that woodies still come squealing into your spread? Two things for the most part: The Migratory Bird Treaty Act of 1918 and wood duck boxes.
Wood ducks evolved to nest in tree cavities, but as large swaths of bottomland timber was cleared and swamps drained, natural tree cavities became scarce. Enter the wood duck box. The first attempt to use them on a large scale came in 1937, when the U.S. Biological Survey erected nearly 500 slab-wood boxes in central Illinois. The second attempt deployed 700 boxes, also in Illinois—and nearly half were used to hatch and rear ducklings. It was proof that the concept worked, and baby wood ducks have been leaping safely out of nesting boxes since.
Today, you can still boost the local population of woodies—and even the regional numbers with the help of other conservation-minded sportsmen”“by building a simple nesting box. If properly placed, it will provide a home for generations of ducks, and ducks for generations of sportsmen. There are lots of nesting-box building plans out there, all with slight variations, but the one below, which comes from Ducks Unlimited
, is my favorite. The straight roof of this box is just easier to build, compared to slanted versions like the one in the photo above. Also, whereas some boxes open at the top, the side door of this version makes it much easier to access the bottom of the box to replace wood shavings when the time comes. So, let’s get started. Here are step-by-step instructions.
Step 1) Get the lumber.
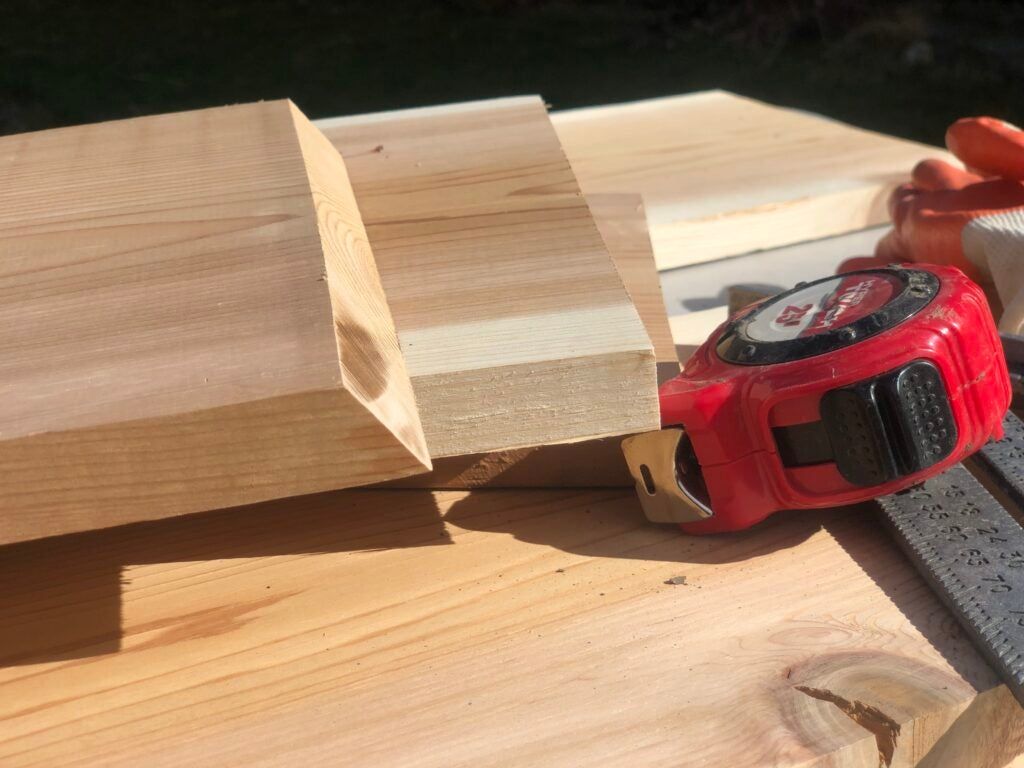
Cedar, with one rough side, is the ideal material for a wood duck box. Dave Hurteau
The first wood duck boxes were made of bark-covered slab-wood, and with current lumber prices, that’s still a good option. Its rough surface provides good footing for baby ducks to climb on, and lumber mills often give it away for free. If you’re going to use finished boards, untreated pine is fine, but cedar is better, as it will last longer outdoors. (Avoid pressure-treated lumber.) Cedar also has a rough side for better baby-duck footing. In any case, you want to start with a 12-foot 1×10, or the equivalent.
Step 2) Crosscut to the right dimensions.
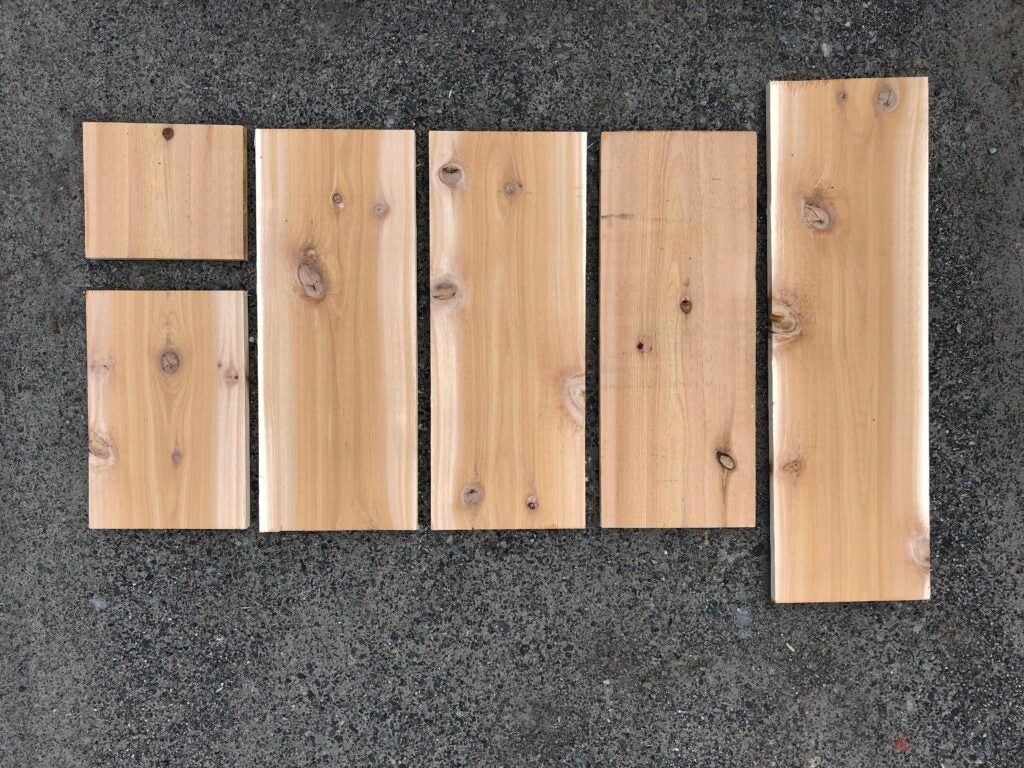
You’ll need to crosscut the 1×10 to so you have a total of six lengths: 7.75 inches, 14 inches, three 23.5-inch lengths, and one 31-incher. Dave Hurteau
Crosscut the 1×10 into the proper lengths. You’ll need a 31-inch board for the back of the box. Three 23.5-inch lengths for the sides. A 14-incher for the top. And a 7.75-inch length for the bottom. Mark each board at “back,” “front,” “left side,” etc. so it’s easy to keep track. If you’re using cedar, make sure the rough side goes on the inside of the box.
Step 3) Mark and cut out the hole.
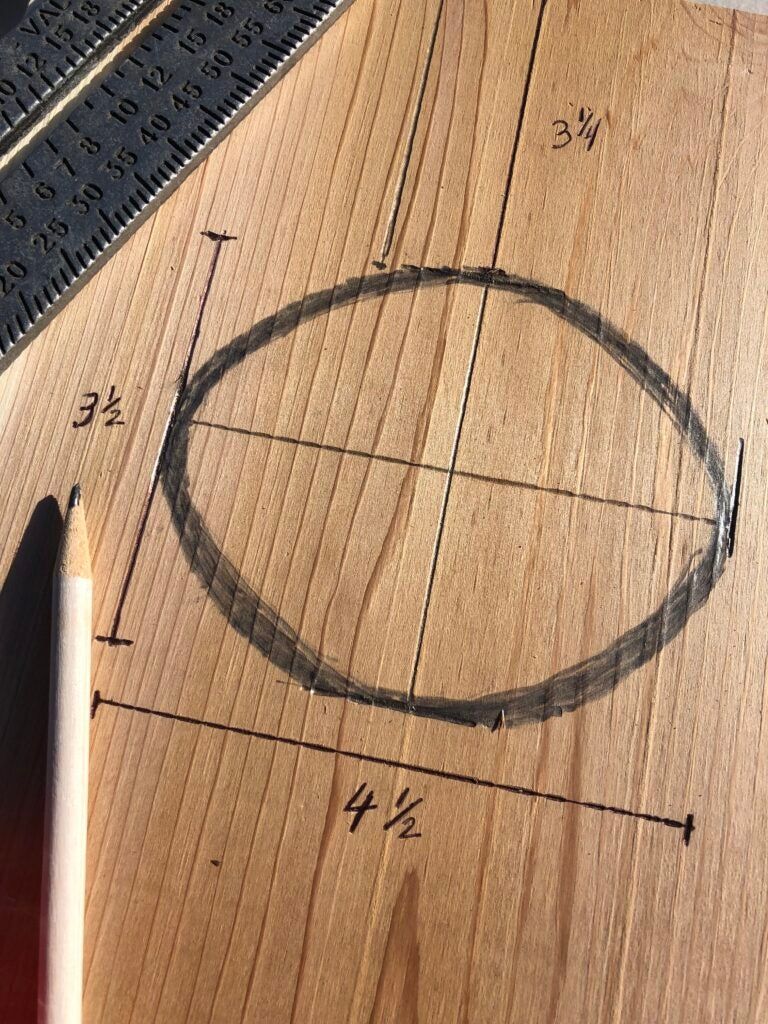
Getting the dimensions of the hole correct is important. Dave Hurteau
On the outer face of the front, mark out an oval-shaped entry hole 3.25 inches down from the top that is 4.5 inches wide and 3.5 inches high. Use a jig saw to make the cut. Over many years of trial and error, managers have landed on these dimension as the perfect-size hole, as it is big enough for adult ducks to get in, but too small for nest-raiding raccoons to get in.
Step 4) Make a series of kerf cuts.
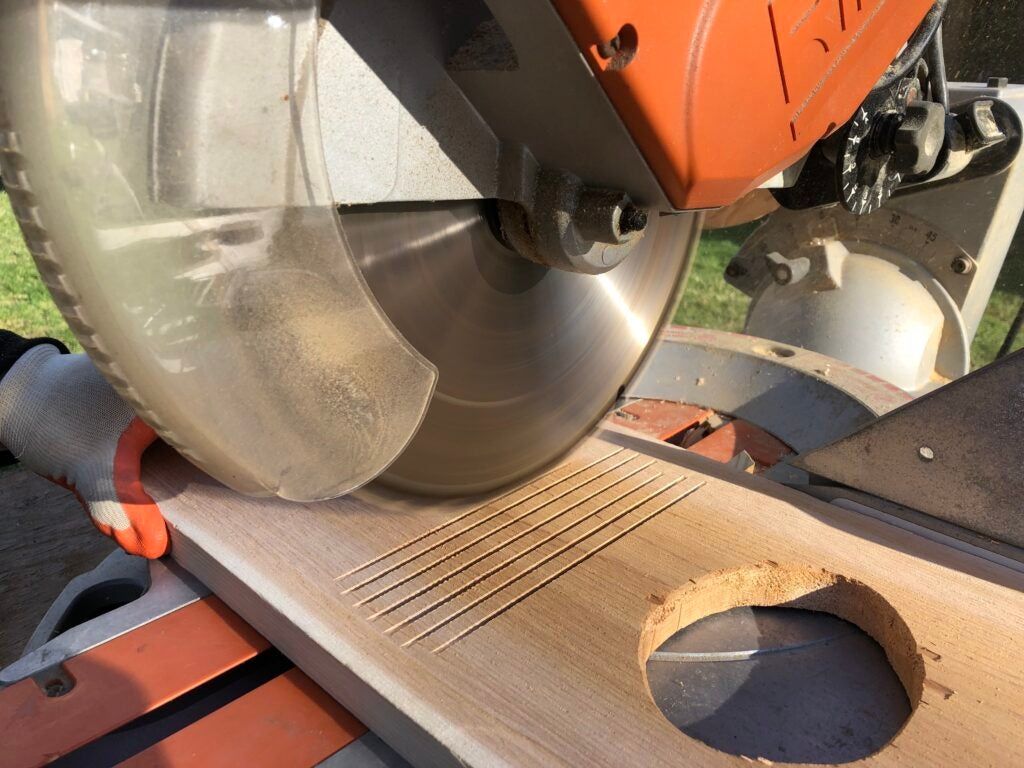
Shallow kerf cuts below the hole provide footing for ducklings. Dave Hurteau
Now, turn the same board over, and, starting just below the hole, score the interior face with shallow horizontal cuts close together. These will give ducklings a toe-hold for climbing up and out of the box.
Step 5) Attached the first side of the box.

Line up the first side to the back and attach with wood screws. Dave Hurteau
Attach the first side panel with using three or four 1-5/8-inch wood screws driven through the back as shown. The back should extend beyond the side by 3.75 inches or so, top and bottom.
Step 6) Make drainage holes in the bottom.
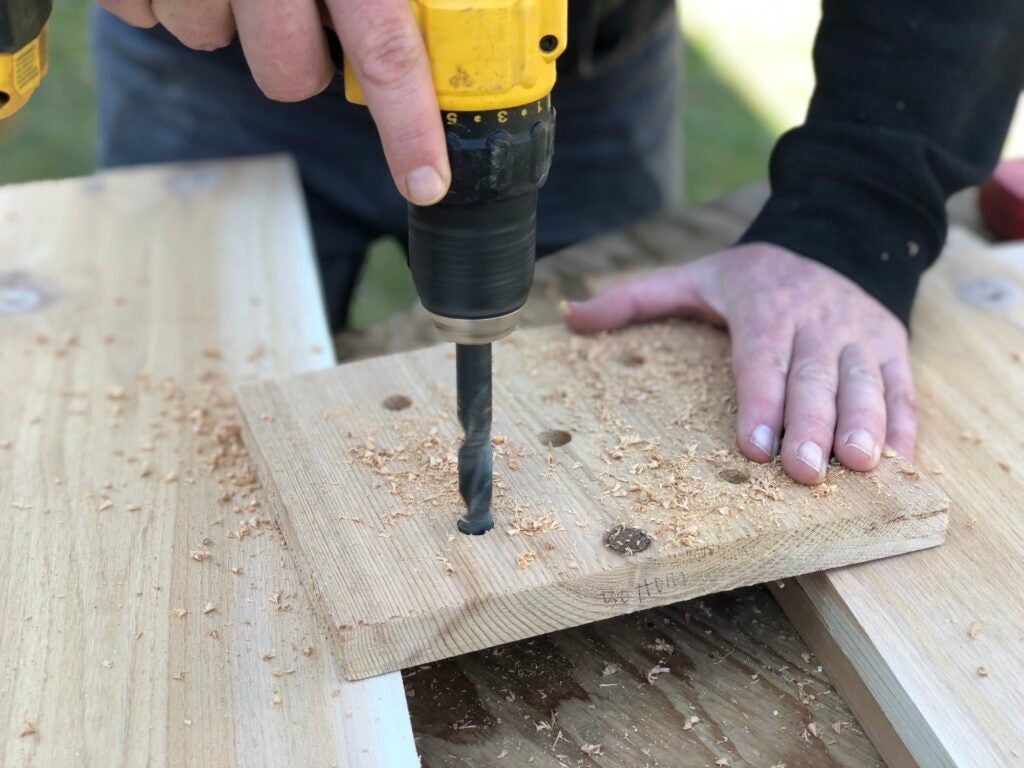
Use a 1/2-inch drill bit and make five holes. Dave Hurteau
Using a ½-inch bit, drill five holes in the floor for drainage. Attach the floor with two screws through the back and two through the side. Then attach the front panel of the box to the side and bottom pieces.
Step 7) Attach the last side and the top.
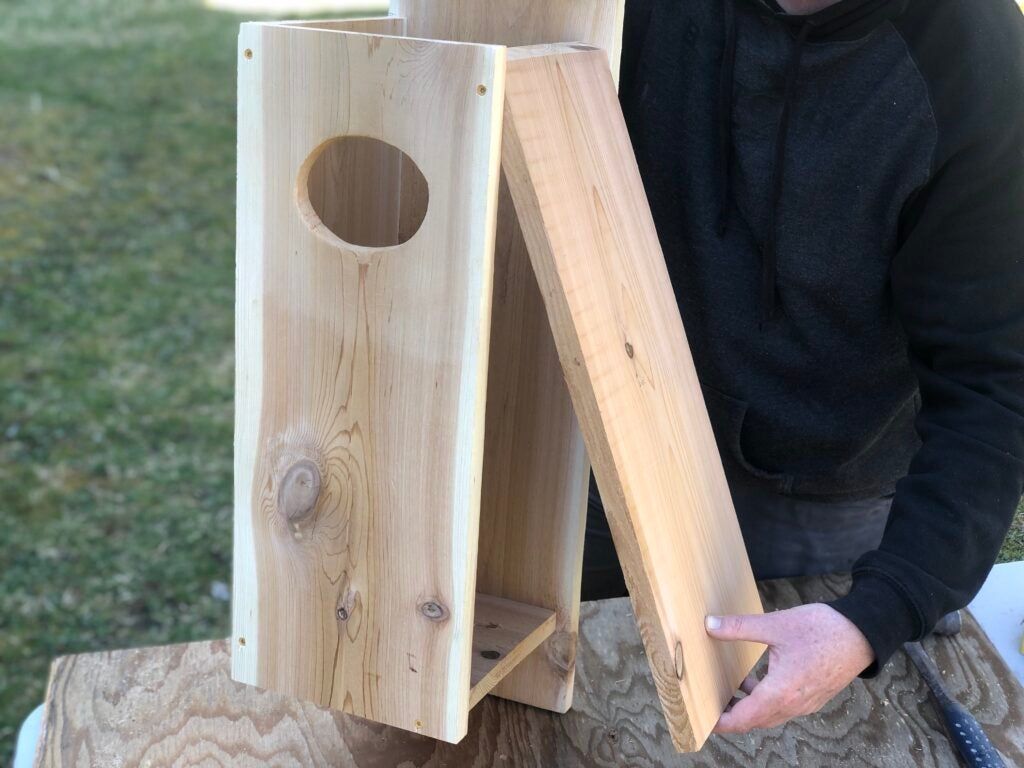
The final side of the box acts as a door. Attach it with two screws only at the top, so it swings open for easy access. Dave Hurteau
Bevel the top outer edge of final side, or round it with a sander or file. Then attach it at the top only with one screw through the front board and one through the back. These screws will act as hinges, allowing this side to function as a door that swings open. Drill a small hole through the bottom right of the front piece and into the side of the door. Insert a nail of a slightly smaller diameter to pin the door shut.
Step 8) Put up your wood duck box.
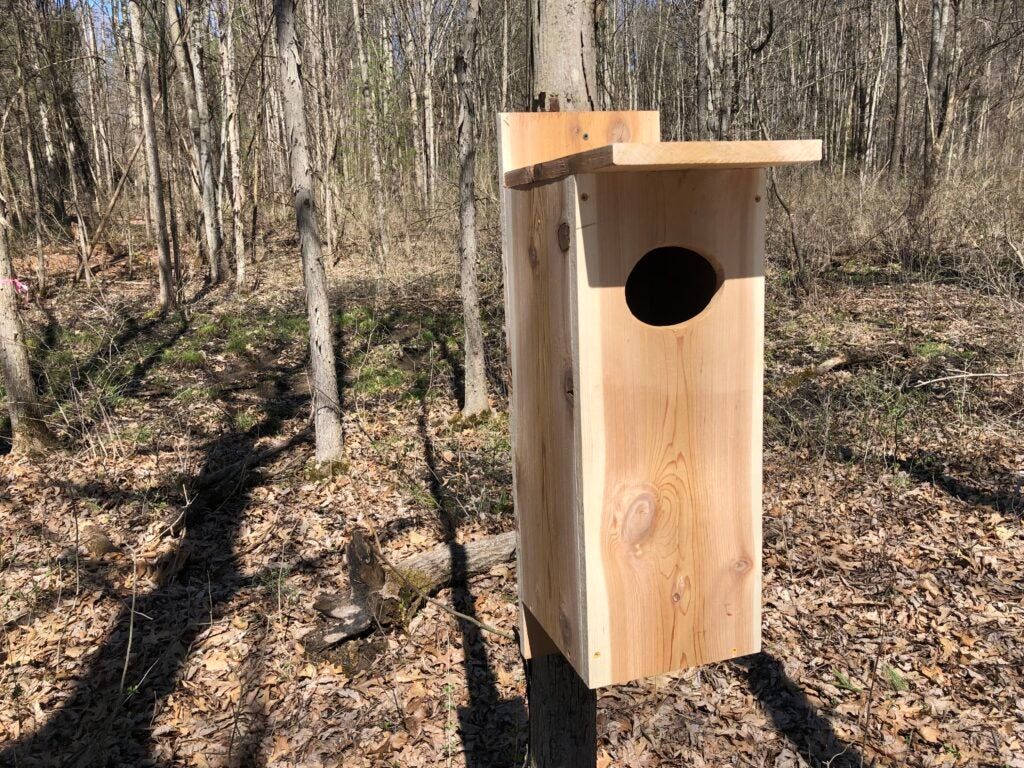
Erect your wood duck box at the water’s edge in an area with good cover. Dave Hurteau
Finally, attached the roof and put 6 inches of wood shavings (not sawdust) in the bottom and place the box directly above the water or along the water’s edge by fixing it to a tree or a metal pole. Be sure to include a predator guard
to keep raccoons and rat snakes and the like out. A conical metal flange or sheet work well, as does a simple section of 8-inch-diameter PVC pipe. Keep the box at a height you can reach, say 5 feet, as you will need to replace the wood shavings yearly. Then get ready to see more wood ducks along your local creeks and ponds.

THE 1871 CLUB