_We may earn revenue from the products available on this page and participate in affiliate programs. Learn more ›
_
Even the sturdiest tents need repairs sometimes, and one of the most common tent repairs is the poles. If you want to prolong the life of your tent, proper tent maintenance can help, but knowing how to fix or replace broken pieces will help too.
We will cover how to fix broken tent poles when you are on the trail and when you are at home. While repair work tends to be easier at home with access to tools and other materials, packing a repair kit and knowing how to use it will keep your shelter intact for the remainder of your trip.
How to Repair Tent Poles
Even poles from the best camping tents
can break from user error, general wear and tear, accidents, or even manufacturer defects. The biggest tent pole fix I’ve ever had was when I crashed while bikepacking. My poles were rolled up in my sleeping pad attached to my bike, and the crash broke a few of the poles along with the shock cord.
Talk about a crash course in tent pole repair! I had to replace the shock cord on the fly and fix a few poles.
Luckily, I was close to camp, and I had a repair kit so I could fix them that night. Having a repair kit with you while camping, backpacking, or hunting can ensure that you stay warm, dry, and protected for the remainder of the trip.
The two main tent pole repairs you may run into are:
Replacing a shock cord
Splinting a broken pole
The type of tent pole you have significantly influences the durability, how you perform repairs, and what needs to be fixed most often.
Tent poles can be made from:
Steel: Not as flexible as other materials, but very durable. They are heavy and strong, typical for square or framed tents. Although a break in a steel pole is uncommon, you may have bends. Steel is also prone to rusting if the materials are not appropriately coated.
Glass-Reinforced Plastic (GRP): These are made out of strands of glass held together in a resin; GRP poles are also known as fiberglass poles. Even though they aren’t all glass, the materials can splinter and break. If you have fiberglass poles, breaks and replacing shock cords will be a common repair.
Aluminum Alloy: Aluminum is very flexible and comparable in flexibility to GRP poles. The main difference between these is aluminum poles are much lighter. Aluminum tent poles are commonly used in backpacking tents because they are lightweight and relatively inexpensive. The primary repair you’ll see with these poles is bent poles and replacing shock cords.
Carbon Fiber: potentially the strongest and most durable tent pole material, carbon fiber is lightweight, flexible, and strong. It is excellent for backpacking, but the primary downside is the high price. Common repairs for carbon fiber include replacing shock cords and the occasional bent pole.
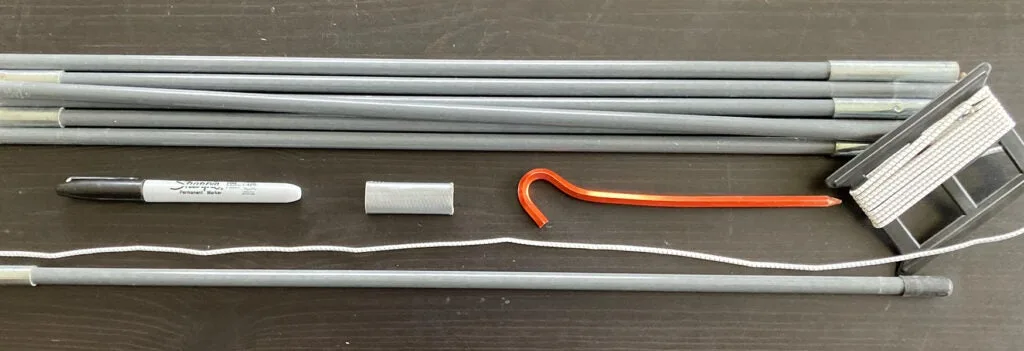
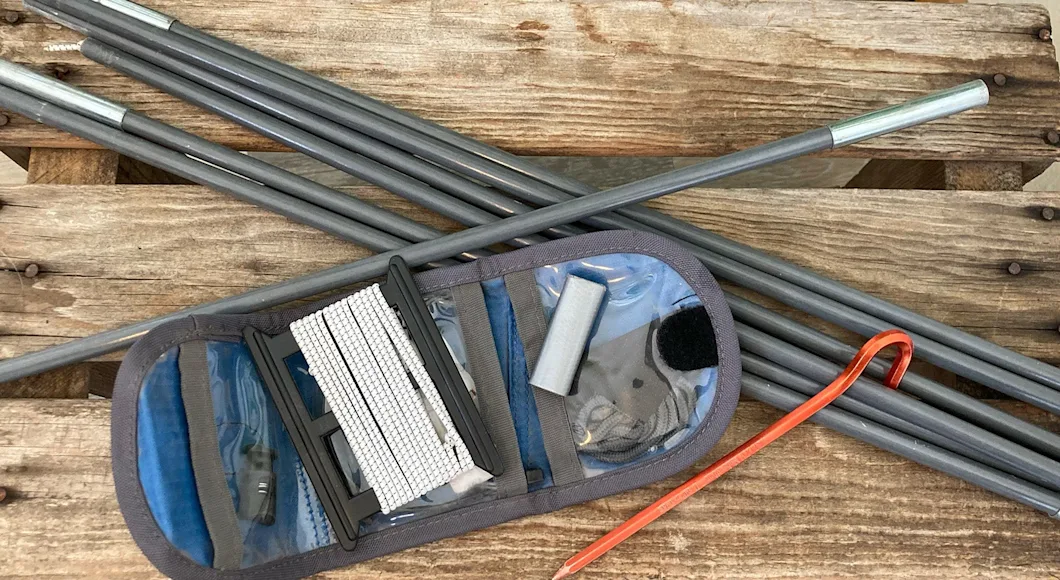
Example of some tent pole repair supplies
What to include in a tent pole repair kit
:
Extra shock cord
Tent sleeve
Duct tape
Optional: guidewire, washers
Other items like a lighter, multi-tool, and even super glue can come in handy for tent pole repairs, but these are likely items you already have packed for other purposes.
We recommend having a complete nylon tent repair kit
if you’re packing a repair kit. These include items for tent pole repair and mesh screen and fabric patches. Buying a premade repair kit can work, but double check it has the proper size tent sleeves, ferrules, and long enough cord.
Replace a Shock Cord
It is easiest to repair a tent shock cord at home when you have access to more tools, but it can also be done in camp. If you are at home, here are the items you need to replace your tent pole’s shock cord:
Sharpie or other marker
Scissors or knife
Lighter
Optional: locking pliers, metal wire, washers, and tape
Whether the elastic cord has just worn out with time or broke, replacing it is relatively easy. Most tent poles will have the same diameter shock cord, but they require different lengths. Once you have a replacement card, start by following these steps:
Lay the tent poles out and label each section with a marker or tape. Do your best to keep the poles in the same order during this process.
You have two choices, pending the situation– you can either remove the old shock cord or tie the new one to the end of the old cord.
To remove the shock cord, take off the end cap and cut the knot at the end of the cord and pull it out on the opposite side.
If the full cord is still intact, we recommend keeping the cord inside the poles, removing one pole tip from the poles and the cord, and looping the new cord through the old one to connect them. This won’t work for all tent pole designs. If this does work for your poles, skip to step four.
Measure the new shock cord against the old cord or the tent poles. Connect the poles and measure about a foot longer than the poles. If you’re using the old cord with no elasticity left, the new cord can be cut about 8 inches shorter than the old one. Mark the measurement on the cord, but wait to cut it until you know what the next step should be.
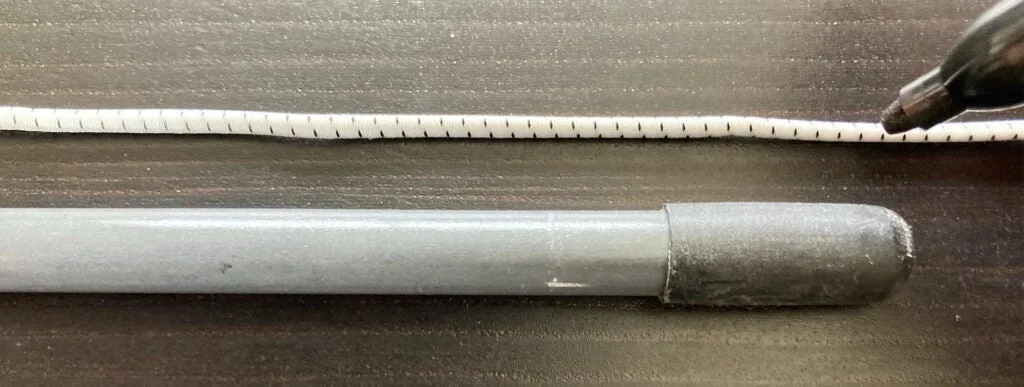
I like to mark near the end of the poles first and then mark again shorter or longer depending on the situation.
The following steps for feeding the cord through the poles will depend on the type of tent poles you have.
If you were able to attach the shock cord ends together, then with the poles attached, remove the other pole tip. Pull the cord through the tent poles until you’ve reached the knotted end. Attach the pole tip to the new cord, but the old cord off, and put the pole tip back onto the end. Skip to step 6 if this worked for you.
If you had to remove the shock cord and have fiberglass tent poles, use a metal wire the length of the poles to pull it through. Shove the wire into the end of the shock cord about ¼ inch and tape them together to thread them through the poles. Tie off one end of the cord with a pole repair washer to prevent it from pulling through when you tension the other end.
If neither is an option, cut the shock cord to the measured length and tie a knot in one end to prevent it from being pulled through. Restring the shock cord through the poles in the appropriate order one at a time until you get to all but the last pole.
After you’ve threaded the shock cord through all but one of the poles, create tension in the shock cord to keep all of the poles connected. Use a pair of locking pliers to hold that tension in place.
With fiberglass poles, you can thread the wire through all tent poles, add tension, and then have the pliers hold the cord in place. You will want to use a repair washer for this end, so slide the washer onto the end of the shock cord, tie a knot in the cord, and get the washer as close to the pliers as you can.
Alternatively, with the cord stretched to the extended length and locking pliers in place, feed the rest of the shock cord through the last pole section. Tie the end of the cord to the pole tip, and then unclamp the pliers.
Secure the other end of the cord however it works best with your tent poles. If the cord is too loose, create slightly more tension, tie a new loop, and attach the pole tip. Be careful not to over tension the cord. You want them to be able to fold up to fit in the tent bag still.
Remove some excess cord but leave a little in case you need to retie the knots at any point. Heat the trimmed ends with a lighter to prevent fraying.
How to Replace a Shock Cord in Camp
The process you follow to replace a shock cord when hiking or camping is essentially the same as at home. We recommend having most of what you need to replace the cord with you in a repair kit, but you may need to improvise a little.
For instance, if you have a multi-tool, you can use a knife to cut the cord instead of scissors. You may also be able to use the pliers on your tool to clamp the cord in place.
If all else fails and you do not even have an extra shock cord, you can use a string or nothing at all. I’ve gotten by with no shock cord in my tent poles for a night or two in a pinch. It makes for some extra difficulty when setting up the tent, but it should stay in place through the night once it is set up.
How to Splint a Broken Tent Pole
While it may seem more dramatic to have a tent pole break versus the shock cord, it is an easier in-field fix. A tent pole break has a few temporary fixes meant to sustain you until you have a chance to replace that section of the tent pole.
All you need to have to repair a broken or bent tent pole is:
Tent sleeve/splint or tent stake
Duct tape or other durable, sticky tape
Splinting tent poles works best when the pole breaks away from connecting points. You can splint the ends of two poles together, making it harder to carry.
How to Use a Tent Sleeve/Splint:
The sleeve should be large enough in diameter to fit over the pole and not move around too much. Most tent companies provide at least one tent sleeve with the purchase of a new tent, but you can also purchase a tent sleeve separately.
Find the broken or bent section of the pole. If the pole is broken, line up the broken area to be as flush as possible. If it is bent, bend it back to be straight.
Slide the tent sleeve over the broken or bent area.
While holding the sleeve in place, wrap duct tape around each end of the sleeve until it is secure. Other heavy duty tape will work for this as well.
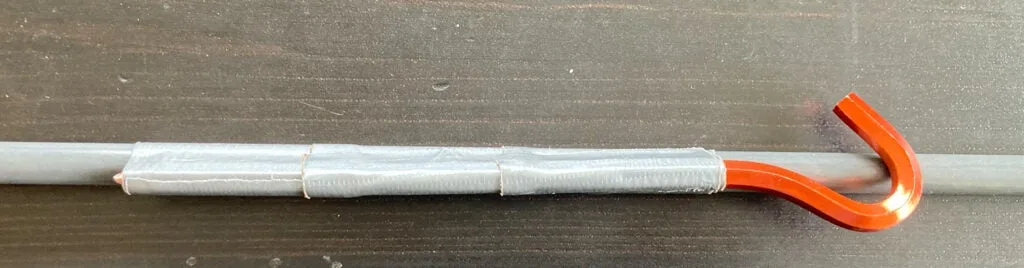
Makeshift splint using a tent stake
How to Use a Tent Stake as a Splint:
If you don’t have a tent sleeve, you can use something else to splint the broken pole: a tent stake. Metal tent stakes work the best, but all you need is a stiff straight object (even a strong stick works) to provide structural integrity to the broken area.
Once you have your materials, line up the broken sections of the pole or bend the pole to be straight once again.
Line the tent stake up center with the broken section.
Starting on one end of the stake, attach the stake to the pole using duct tape or other heavy duty tape. You may need to wrap it a few times to ensure it is tight and will not move or slide.
Whether you have a surprise repair due to an accident like I did, or your tent poles just need a little extra love to last longer, tent pole repairs can be made easy with a bit of practice and the proper repair equipment. If there is one piece of advice we can give folks, it is to be prepared. Packing a repair kit with you is the best way to ease the stress of damaged equipment on the trail. Hopefully, you won’t have to use it, but you’ll be ready if you do.
FAQs
Q: What kind of tent pole is the most durable?
Carbon fiber tent poles are among the best materials for tent poles because of their durability and ultralight construction. Many professional guides and outdoor athletes use them, but they have a high price point.
Aluminum alloy tent poles are far more affordable while still being durable, lightweight, and flexible. They hold up well in most conditions, but they will corrode quickly if you camp or travel near saltwater. If you look strictly for durability, steel tent poles will be the strongest. They are very heavy and don’t work well if you carry your gear.
Q: Can you buy replacement tent poles?
Yes, you can buy replacement tent poles. Most tent manufacturers sell replacement poles if you cannot fix a broken tent pole effectively or want to replace the one you’ve splinted. There are also universal poles sold, but make sure they are the same materials and length. You can buy a whole set or individual sections.
Q: Are there gear repair shops that fix tent poles?
Yes, local gear shops or large retail shops may repair tent poles or have replacement parts in stock. Contact a local outdoor gear store to learn more about their services. Many backpacking tents
have some kind of repair or replacement tent pole program. If you have an MSR brand tent, tent pole repairs fall under a limited lifetime warranty and can be replaced. Other tent brands may have repair policies and warranties, and we recommend contacting the tent company directly to see if they can repair or replace the tent pole.
Q: What is a tent pole repair sleeve?
A tent pole sleeve is often provided with your tent and is the fastest way to repair a broken or bent tent pole. It is meant to be a quick fix on the trail until you can get back to a place for a permanent fix or replacement of the pole. It can also be called a splint and looks like a short tube that fits over the broken area of the pole to make it usable again.
Q: How long should a tent pole shock cord be?
Use your tent poles or the old shock cord to measure the appropriate length. Always measure slightly longer than the tent poles and shorten it later. If you are using the old shock cord as a guide, be careful not to cut it too long or short. If the elasticity of the old cord is gone, it won’t be easy to get a proper measurement, and using the poles might be easier.